1. Project Work
This car is work based on two model.
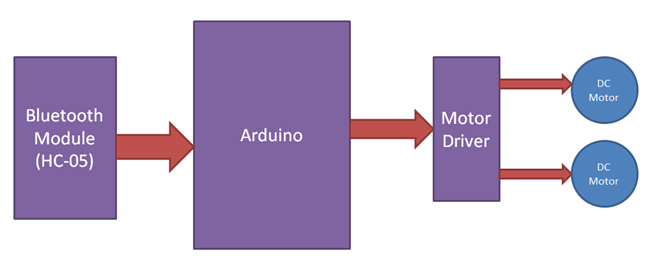
* Blutooth Controlled
Bluetooth module has two modes one is master mode and second one is slave mode. User can set
either mode by using some AT commands. Even user can set module’s setting by using AT
command. Here is some commands uses are given:
Press Forword button: Car moves forward. ( all wheels start moving forward )
Press Back button: Car moves in reverse. ( all wheels start moving backward )
Press Left button: Car turns to left side. ( Only right wheels move forword left move
reverse)
Press Right button: Car turns to right side. ( Only left wheels move forward right move
reverse)
When all buttons press then car will going to line following. this button sending data to
blutooth module
and this module send to Arduino Board then board take action accordng from user
 * Line Follower
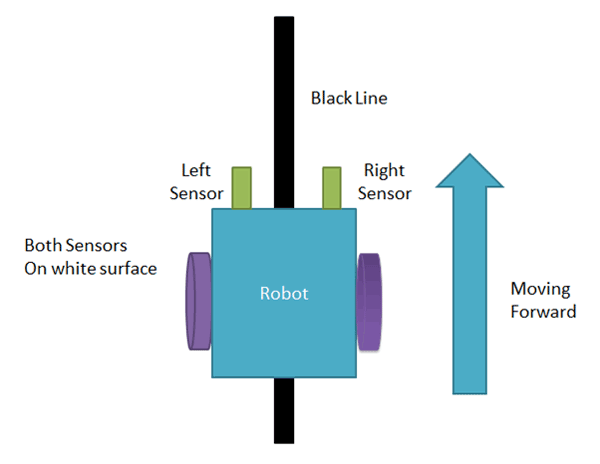
The concept of working of line follower is related to light. We use here the behavior of
light at the black and white surfaces. When light falls on a white surface it is almost
fully reflected and in the case of a black surface light is completely absorbed. This
behavior of light is used in building a line follower robot.
2. Components
All components are required.
3. Work Of Components
All parts word diffrent diffrent something like this.
* Toy Car
It's for design car and setup all parts.
* Arduino Board
The Arduino software is used to build the code for every project made using any Arduino
boards; it mostly uses the C/C++ language for its coding. Once the code is ready, we have to
just compile and upload it on the board to make our project work. There are many types of
Arduino boards like Arduino Uno, Arduino Nano, Arduino USB, etc. In this project, we are
going to use the Arduino UNO board (Atmega 328p).
* Bluetooth Module
HC Bluetooth module consists two things one is Bluetooth serial interface module and a
Bluetooth adaptor. Bluetooth serial module is used for converting serial port to Bluetooth.
* Gear Motor
We have used two geared motors at the rear of the line follower robot. These motors provide
more torque than normal motors and can be used for carrying some load as well.
* Motor Driver
The L298N Motor Driver Module is responsible for providing the necessary drive current to
the motors of the robotic car. I have provided information about L298N Module in an earlier
project called Arduino DC Motor Control using L298N.
* Motor Wheels
wheels used for car moving and simply its work.
* Jumper Wires
Jumper wires are simply wires that have connector pins at each end, allowing them to be used
to connect two points to each other without soldering. Jumper wires are typically used with
breadboards and other prototyping tools in order to make it easy to change a circuit as
needed. Fairly simple. In fact, it doesn’t get much more basic than jumper wires.
It is 3 type male to male, female to female, female to male
* Battery
Battery is one of the most important thing in this project ! It's use for current in circuit
I use 3.7v battery 4pcs when these are connected to serise conection then its work base on
14.8v and
this power user in motor driver and arduino.
* LED
In this project led used for light as front light, back light, left light etc.
* IR Sensor
It's used for line follower black object detection. Its's not working black surface and sun
light
* Touch Sensor
It's used for light connection toggle on and off in arduino.
* LDR Sensor
It's used for known brightness like day or night.
* PIR Sensor
PIR sensors are most commonly used in motion-based detection, such as in-home security
systems. When a moving object that generates infrared radiation enters the sensing range of
the detector, the difference in IR levels between the two pyroelectric elements is measured.
The sensor then sends an electronic signal to an embedded computer, which in turn triggers
an alarm.
* Switch Sensor
It's used for light connection toggle on and off in main circuit.
* Speaker
It's used for horn when car will going to reverse then its work.
* Bridge Rectifier
When battery will going to die then cahrging battery from bridge rectifeir
* Simple Wires
Simple Wires are used to bear mechanical loads or electricity and telecommunications
signals and connectoins for motor and battery etc.
* Electrical instruments
Electrical instruments are instruments that use the mechanical movement of electromagnetic
meter to measure voltage, power, current… Electrical technicians require electrical
measurement equipment to check the electrical activity and to detect the presence of voltage
or current. By using this instrument we can measure electrical parameters such as voltage,
frequency, current, power factor, and resistance. Electrical measurements are depended upon
either current or voltage while measuring the frequency we will be measuring the frequency
of a current signal or a voltage signal.
* Bluetooth Controller App
After installing app you need to open it and then search Bluetooth device and select desired
Bluetooth device. And then configure keys. Here in this project we have used Bluetooth
controller app.
* Android device
It's used for handling car from blutooth car app
* Arduino IDE
The open-source Arduino Software (IDE) makes it easy to write code and upload it to the
board. This software can be used with any Arduino board.
4. Connections of Components
* Setup Connection
In this connection is only simply like joining all part to toy car.
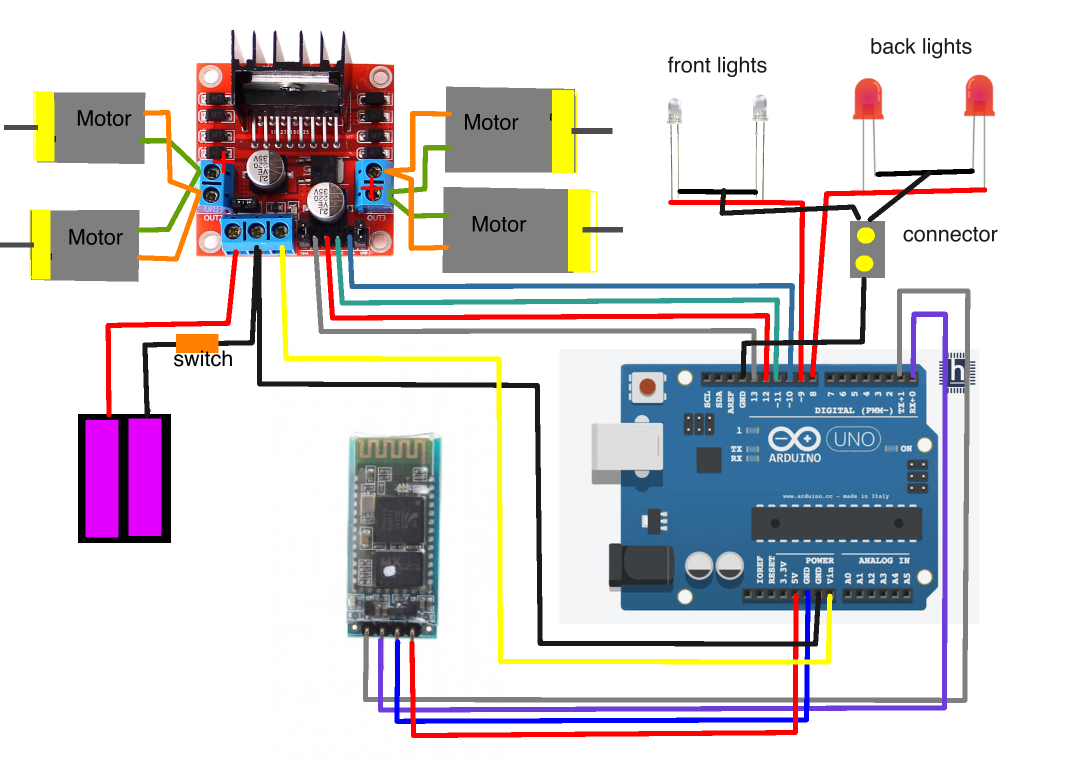
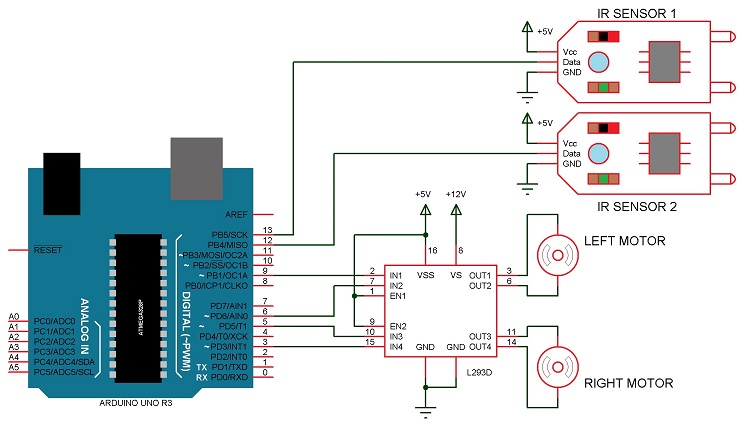
* Pin or Physically Connection
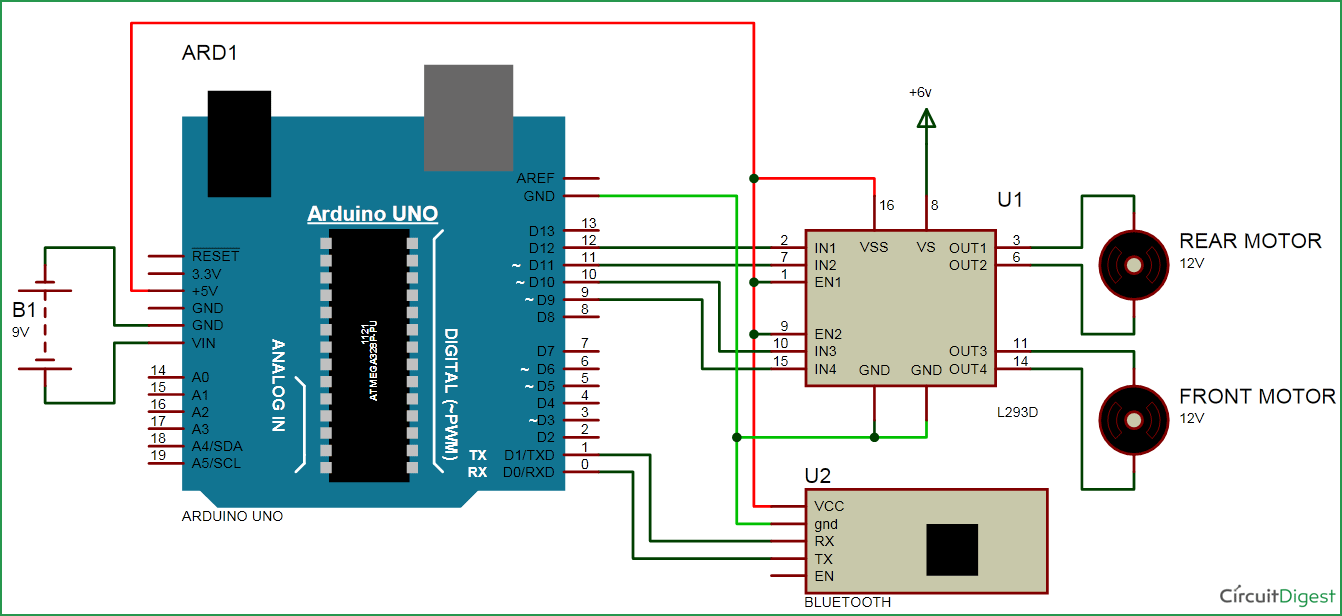
Here, I want to tell one important point that, The code that will be given should be
uploaded before connection of the pins; else you will face an error in uploading the code,
so, just first copy the code provided below and pasted in the Arduino software and upload it
to the board before the pin connections.
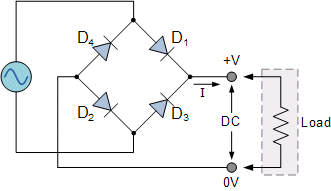
* Power Connection
In this connection is electrical connection for battery and his charge and bridge rectifeir
connection.
5. Coding
In this coding part is three division first one
* Arduino Code
First install the Arduino software. Installation instructions are very simple, you should
not have any trouble with this step.
The code at the master device, or the joystick is quite simple. We just need to read the X
and Y values of the joystick, which actually regulate the speed of the motors, and send them
via the serial port to the slave HC-05 Bluetooth device. We can note here that the analog
values of joystick from 0 to 1023 are converted into a values from 0 to 255 by diving them
by 4.
#define int1 10
#define int2 9
#define int3 6
#define int4 5
#define front_light 13
#define left_light 12
#define right_light 11
#define main_light 8
#define back_light 7
#define speaker 3
#define vcc_ir 4
#define left_ir A0
#define right_ir A1
#define ldr A2
char data;
int ldrVal;


void setup() {
  pinMode(int1, OUTPUT);
  pinMode(int2, OUTPUT);
  pinMode(int3, OUTPUT);
  pinMode(int4, OUTPUT);
  pinMode(main_light, OUTPUT);   // main light (in car)
  pinMode(front_light, OUTPUT);  // front light
  pinMode(back_light, OUTPUT);   // back light
  pinMode(left_light, OUTPUT);   //side left light
  pinMode(right_light, OUTPUT);  //side right light
  pinMode(speaker, OUTPUT);      //speaker for horn
  pinMode(vcc_ir, OUTPUT);      //speaker for horn
  pinMode(left_ir, INPUT);       // initialize Left sensor as an input
  pinMode(right_ir, INPUT);      // initialize Right sensor as an input
  pinMode(ldr, INPUT);           // initialize ldr sensor for brightness
  Serial.begin(9600);            //Set the baud rate to your Bluetooth module.
}

void loop() {
if(Serial.available()){
  data = Serial.read();
  Serial.println(data);
}

ldrVal = analogRead(ldr);
if(ldrVal <= 400){
  digitalWrite(main_light,HIGH);
  digitalWrite(front_light,HIGH);
} else {
  digitalWrite(main_light,LOW);
  digitalWrite(front_light,LOW);
}

if(data == 'F'){                 //move forward
  digitalWrite(int1,HIGH);
  digitalWrite(int3,HIGH);
  digitalWrite(speaker,LOW);
  digitalWrite(left_light,LOW);
  digitalWrite(right_light,LOW);
  digitalWrite(back_light,LOW);
}

else if(data == 'B'){            //move reverse
  digitalWrite(int2,HIGH);
  digitalWrite(int4,HIGH);
  digitalWrite(back_light,HIGH);
  digitalWrite(speaker,HIGH);
  digitalWrite(left_light,LOW);
  digitalWrite(right_light,LOW);
}

else if(data == 'L'){            //turn left
  digitalWrite(int1,HIGH);
  digitalWrite(int4,HIGH);
  digitalWrite(left_light,HIGH);
  digitalWrite(right_light,LOW);
}

else if(data == 'G'){            //turn forword left
  digitalWrite(int1,HIGH);
  analogWrite(int3,100);
  digitalWrite(left_light,HIGH);
  digitalWrite(right_light,LOW);
}

else if(data == 'H'){           //turn back left
  digitalWrite(int2,HIGH);
  analogWrite(int4,100);
  digitalWrite(back_light,HIGH);
  analogWrite(speaker,100);
  digitalWrite(left_light,HIGH);
  digitalWrite(right_light,LOW);
}

else if(data == 'J'){           //turn back right
  analogWrite(int2,100);
  digitalWrite(int4,HIGH);
  digitalWrite(back_light,HIGH);
  analogWrite(speaker,100);
  digitalWrite(right_light,HIGH);
  digitalWrite(left_light,LOW);
}

else if(data == 'I'){           //turn forword right
  analogWrite(int1,100);
  digitalWrite(int3,HIGH);
  digitalWrite(right_light,HIGH);
  digitalWrite(left_light,LOW);
}

else if(data == 'R'){           //turn right
  digitalWrite(int3,HIGH);
  digitalWrite(int2,HIGH);
  digitalWrite(right_light,HIGH);
  digitalWrite(left_light,LOW);
}

else if(data == 'W'){           //turn on front light
  digitalWrite(front_light,HIGH);
}

else if(data == 'w'){           //turn off front light
  digitalWrite(front_light,LOW);
}

else if(data == 'U'){           //turn on back light
  digitalWrite(back_light,HIGH);
}

else if(data == 'u'){           //turn off back light
  digitalWrite(back_light,LOW);
}

else if(data == 'V'){           //turn on horn
  digitalWrite(speaker,HIGH);
}

else if(data == 'v'){           //turn off horn
  digitalWrite(speaker,LOW);
}

else if(data == 'S'){           //STOP (all motors stop) and on back light
  digitalWrite(int1,LOW);
  digitalWrite(int2,LOW);
  digitalWrite(int3,LOW);
  digitalWrite(int4,LOW);
  digitalWrite(back_light,HIGH);
  digitalWrite(left_light,LOW);
  digitalWrite(right_light,LOW);
  digitalWrite(speaker,LOW);
}

else if(data == 'X'){         // this code for lane following
  digitalWrite(vcc_ir,HIGH);
  int LEFT_SENSOR = digitalRead(left_ir);
  int RIGHT_SENSOR = digitalRead(right_ir);

  if(RIGHT_SENSOR==0 && LEFT_SENSOR==0) {
    analogWrite(int1,100);
    analogWrite(int2,0);
    analogWrite(int3,100);       //FORWARD
    analogWrite(int4,0);
    digitalWrite(speaker,LOW);
    digitalWrite(left_light,LOW);
    digitalWrite(right_light,LOW);
    digitalWrite(back_light,LOW);
  }

    else if(RIGHT_SENSOR==0 && LEFT_SENSOR==1) {
    analogWrite(int1,150);
    analogWrite(int4,150);     //Move left
    digitalWrite(left_light,HIGH);
    digitalWrite(right_light,LOW);
    digitalWrite(int2,LOW);
    digitalWrite(int3,LOW);
  }

    else if(RIGHT_SENSOR==1 && LEFT_SENSOR==0) {
    analogWrite(int3,150);
    analogWrite(int2,150);     //Move right
    digitalWrite(right_light,HIGH);
    digitalWrite(left_light,LOW);
    digitalWrite(int1,LOW);
    digitalWrite(int4,LOW);
  }

    else if(RIGHT_SENSOR==1 && LEFT_SENSOR==1) {
    analogWrite(int1,0);
    analogWrite(int2,0);
    analogWrite(int3,0);
    analogWrite(int4,0);      //STOP
    digitalWrite(back_light, HIGH);
    digitalWrite(left_light,LOW);
    digitalWrite(right_light,LOW);
    digitalWrite(speaker,LOW);
  }

}

else if(data =='x'){
  digitalWrite(vcc_ir,LOW);
}
}
* Android App Code
Create a separate thread in your code to initiate a connection using the MAC Address that we
previously obtained. This thread will manage what happens if a connection is successfully
established or failed to be established. It also handles if we want to close the Bluetooth
connection.
Create a new project with the empty activity template and select the
appropriate
name for your app. For this app we will create 2 activities and 2 Java classes :
# activity_main.xml file
<?xml version="1.0" encoding="utf-8"?>
<RelativeLayout xmlns:android="http://schemas.android.com/apk/res/android"
    xmlns:tools="http://schemas.android.com/tools"
    android:layout_width="match_parent"
    android:layout_height="match_parent"
    android:paddingBottom="@dimen/activity_vertical_margin"
    android:paddingLeft="@dimen/activity_horizontal_margin"
    android:paddingRight="@dimen/activity_horizontal_margin"
    android:paddingTop="@dimen/activity_vertical_margin"
    tools:context="com.example.philipgo.arduinobluetoothrccar.MainActivity">

<Button
        android:layout_width="wrap_content"
        android:layout_height="80dp"
        android:text="Forward"
        android:id="@+id/forward_btn"
        android:layout_marginTop="74dp"
        android:layout_alignParentTop="true"
        android:layout_toLeftOf="@+id/forward_right_btn"
        android:layout_toStartOf="@+id/forward_right_btn">

<Button
        android:layout_width="wrap_content"
        android:layout_height="80dp"
        android:text="forward LEFT"
        android:id="@+id/forward_left_btn"
        android:layout_below="@+id/forward_btn"
        android:layout_toLeftOf="@+id/forward_btn"
        android:layout_toStartOf="@+id/forward_btn" >

<Button
        android:layout_width="wrap_content"
        android:layout_height="80dp"
        android:text="forward RIGHT"
        android:id="@+id/forward_right_btn"
        android:layout_above="@+id/reverse_btn"
        android:layout_toRightOf="@+id/reverse_btn"
        android:layout_toEndOf="@+id/reverse_btn" />

<Button
        android:layout_width="wrap_content"
        android:layout_height="80dp"
        android:text="REVERSE"
        android:id="@+id/reverse_btn"
        android:layout_below="@+id/forward_left_btn"
        android:layout_centerHorizontal="true"
        android:layout_marginTop="48dp" />

<Button
        android:layout_width="wrap_content"
        android:layout_height="80dp"
        android:text="Reverse Left"
        android:id="@+id/reverse_left_btn"
        android:layout_below="@+id/forward_left_btn"
        android:layout_alignLeft="@+id/forward_left_btn"
        android:layout_alignStart="@+id/forward_left_btn"
        android:layout_centerHorizontal="true" />

<Button
        android:layout_width="wrap_content"
        android:layout_height="80dp"
        android:text="Reverse Right"
        android:id="@+id/reverse_right_btn"
        android:layout_below="@+id/forward_right_btn"
        android:layout_toRightOf="@+id/reverse_btn"
        android:layout_alignRight="@+id/forward_right_btn"
        android:layout_alignEnd="@+id/forward_right_btn" />

<Button
        android:layout_width="wrap_content"
        android:layout_height="50dp"
        android:text="Connect to Bluetooth Device"
        android:id="@+id/bluetooth_connect_btn"
        android:layout_alignParentBottom="true"
        android:layout_centerHorizontal="true" />
</RelativeLayout>
# MainActivity.java file
package com.mcuhq.simplebluetooth;

import android.Manifest;
import android.bluetooth.BluetoothAdapter;
import android.bluetooth.BluetoothDevice;
import android.bluetooth.BluetoothSocket;
import android.content.BroadcastReceiver;
import android.content.Context;
import android.content.Intent;
import android.content.IntentFilter;
import android.content.pm.PackageManager;
import android.os.Bundle;
import android.os.Handler;
import android.os.Looper;
import android.os.Message;
import android.support.v4.app.ActivityCompat;
import android.support.v4.content.ContextCompat;
import android.support.v7.app.AppCompatActivity;
import android.util.Log;
import android.view.View;
import android.widget.AdapterView;
import android.widget.ArrayAdapter;
import android.widget.Button;
import android.widget.CheckBox;
import android.widget.ListView;
import android.widget.TextView;
import android.widget.Toast;

import java.io.IOException;
import java.io.UnsupportedEncodingException;
import java.lang.reflect.Method;
import java.util.Set;
import java.util.UUID;

public class MainActivity extends AppCompatActivity {

    private final String TAG = MainActivity.class.getSimpleName();

    private static final UUID BT_MODULE_UUID = UUID.fromString("00001101-0000-1000-8000-00805F9B34FB"); // "random" unique identifier

    // #defines for identifying shared types between calling functions
    private final static int REQUEST_ENABLE_BT = 1; // used to identify adding bluetooth names
    public final static int MESSAGE_READ = 2; // used in bluetooth handler to identify message update
    private final static int CONNECTING_STATUS = 3; // used in bluetooth handler to identify message status

    // GUI Components
    private TextView mBluetoothStatus;
    private TextView mReadBuffer;
    private Button mScanBtn;
    private Button mOffBtn;
    private Button mListPairedDevicesBtn;
    private Button mDiscoverBtn;
    private ListView mDevicesListView;
    private CheckBox mLED1;

    private BluetoothAdapter mBTAdapter;
    private Set<BluetoothDevice> mPairedDevices;
    private ArrayAdapter<String> mBTArrayAdapter;

    private Handler mHandler; // Our main handler that will receive callback notifications
    private ConnectedThread mConnectedThread; // bluetooth background worker thread to send and receive data
    private BluetoothSocket mBTSocket = null; // bi-directional client-to-client data path

    @Override
    protected void onCreate(Bundle savedInstanceState) {
        super.onCreate(savedInstanceState);
        setContentView(R.layout.activity_main);

        mBluetoothStatus = (TextView)findViewById(R.id.bluetooth_status);
        mReadBuffer = (TextView) findViewById(R.id.read_buffer);
        mScanBtn = (Button)findViewById(R.id.scan);
        mOffBtn = (Button)findViewById(R.id.off);
        mDiscoverBtn = (Button)findViewById(R.id.discover);
        mListPairedDevicesBtn = (Button)findViewById(R.id.paired_btn);
        mLED1 = (CheckBox)findViewById(R.id.checkbox_led_1);

        mBTArrayAdapter = new ArrayAdapter<>(this, android.R.layout.simple_list_item_1);
        mBTAdapter = BluetoothAdapter.getDefaultAdapter(); // get a handle on the bluetooth radio

        mDevicesListView = (ListView)findViewById(R.id.devices_list_view);
        mDevicesListView.setAdapter(mBTArrayAdapter); // assign model to view
        mDevicesListView.setOnItemClickListener(mDeviceClickListener);

        // Ask for location permission if not already allowed
        if(ContextCompat.checkSelfPermission(this, Manifest.permission.ACCESS_COARSE_LOCATION) != PackageManager.PERMISSION_GRANTED)
            ActivityCompat.requestPermissions(this, new String[]{Manifest.permission.ACCESS_COARSE_LOCATION}, 1);


        mHandler = new Handler(Looper.getMainLooper()){
            @Override
            public void handleMessage(Message msg){
                if(msg.what == MESSAGE_READ){
                    String readMessage = null;
                    try {
                        readMessage = new String((byte[]) msg.obj, "UTF-8");
                    } catch (UnsupportedEncodingException e) {
                        e.printStackTrace();
                    }
                    mReadBuffer.setText(readMessage);
                }

                if(msg.what == CONNECTING_STATUS){
                    if(msg.arg1 == 1)
                        mBluetoothStatus.setText("Connected to Device: " + msg.obj);
                    else
                        mBluetoothStatus.setText("Connection Failed");
                }
            }
        };

        if (mBTArrayAdapter == null) {
            // Device does not support Bluetooth
            mBluetoothStatus.setText("Status: Bluetooth not found");
            Toast.makeText(getApplicationContext(),"Bluetooth device not found!",Toast.LENGTH_SHORT).show();
        }
        else {

            mLED1.setOnClickListener(new View.OnClickListener(){
                @Override
                public void onClick(View v){
                    if(mConnectedThread != null) //First check to make sure thread created
                        mConnectedThread.write("1");
                }
            });


            mScanBtn.setOnClickListener(new View.OnClickListener() {
                @Override
                public void onClick(View v) {
                    bluetoothOn();
                }
            });

            mOffBtn.setOnClickListener(new View.OnClickListener(){
                @Override
                public void onClick(View v){
                    bluetoothOff();
                }
            });

            mListPairedDevicesBtn.setOnClickListener(new View.OnClickListener() {
                @Override
                public void onClick(View v){
                    listPairedDevices();
                }
            });

            mDiscoverBtn.setOnClickListener(new View.OnClickListener(){
                @Override
                public void onClick(View v){
                    discover();
                }
            });
        }
    }

    private void bluetoothOn(){
        if (!mBTAdapter.isEnabled()) {
            Intent enableBtIntent = new Intent(BluetoothAdapter.ACTION_REQUEST_ENABLE);
            startActivityForResult(enableBtIntent, REQUEST_ENABLE_BT);
            mBluetoothStatus.setText("Bluetooth enabled");
            Toast.makeText(getApplicationContext(),"Bluetooth turned on",Toast.LENGTH_SHORT).show();

        }
        else{
            Toast.makeText(getApplicationContext(),"Bluetooth is already on", Toast.LENGTH_SHORT).show();
        }
    }

    // Enter here after user selects "yes" or "no" to enabling radio
    @Override
    protected void onActivityResult(int requestCode, int resultCode, Intent Data){
        // Check which request we're responding to
        if (requestCode == REQUEST_ENABLE_BT) {
            // Make sure the request was successful
            if (resultCode == RESULT_OK) {
                // The user picked a contact.
                // The Intent's data Uri identifies which contact was selected.
                mBluetoothStatus.setText("Enabled");
            }
            else
                mBluetoothStatus.setText("Disabled");
        }
    }

    private void bluetoothOff(){
        mBTAdapter.disable(); // turn off
        mBluetoothStatus.setText("Bluetooth disabled");
        Toast.makeText(getApplicationContext(),"Bluetooth turned Off", Toast.LENGTH_SHORT).show();
    }

    private void discover(){
        // Check if the device is already discovering
        if(mBTAdapter.isDiscovering()){
            mBTAdapter.cancelDiscovery();
            Toast.makeText(getApplicationContext(),"Discovery stopped",Toast.LENGTH_SHORT).show();
        }
        else{
            if(mBTAdapter.isEnabled()) {
                mBTArrayAdapter.clear(); // clear items
                mBTAdapter.startDiscovery();
                Toast.makeText(getApplicationContext(), "Discovery started", Toast.LENGTH_SHORT).show();
                registerReceiver(blReceiver, new IntentFilter(BluetoothDevice.ACTION_FOUND));
            }
            else{
                Toast.makeText(getApplicationContext(), "Bluetooth not on", Toast.LENGTH_SHORT).show();
            }
        }
    }

    final BroadcastReceiver blReceiver = new BroadcastReceiver() {
        @Override
        public void onReceive(Context context, Intent intent) {
            String action = intent.getAction();
            if(BluetoothDevice.ACTION_FOUND.equals(action)){
                BluetoothDevice device = intent.getParcelableExtra(BluetoothDevice.EXTRA_DEVICE);
                // add the name to the list
                mBTArrayAdapter.add(device.getName() + "\n" + device.getAddress());
                mBTArrayAdapter.notifyDataSetChanged();
            }
        }
    };

    private void listPairedDevices(){
        mBTArrayAdapter.clear();
        mPairedDevices = mBTAdapter.getBondedDevices();
        if(mBTAdapter.isEnabled()) {
            // put it's one to the adapter
            for (BluetoothDevice device : mPairedDevices)
                mBTArrayAdapter.add(device.getName() + "\n" + device.getAddress());

            Toast.makeText(getApplicationContext(), "Show Paired Devices", Toast.LENGTH_SHORT).show();
        }
        else
            Toast.makeText(getApplicationContext(), "Bluetooth not on", Toast.LENGTH_SHORT).show();
    }

    private AdapterView.OnItemClickListener mDeviceClickListener = new AdapterView.OnItemClickListener() {
        @Override
        public void onItemClick(AdapterView parent, View view, int position, long id) {

            if(!mBTAdapter.isEnabled()) {
                Toast.makeText(getBaseContext(), "Bluetooth not on", Toast.LENGTH_SHORT).show();
                return;
            }

            mBluetoothStatus.setText("Connecting...");
            // Get the device MAC address, which is the last 17 chars in the View
            String info = ((TextView) view).getText().toString();
            final String address = info.substring(info.length() - 17);
            final String name = info.substring(0,info.length() - 17);

            // Spawn a new thread to avoid blocking the GUI one
            new Thread()
            {
                @Override
                public void run() {
                    boolean fail = false;

                    BluetoothDevice device = mBTAdapter.getRemoteDevice(address);

                    try {
                        mBTSocket = createBluetoothSocket(device);
                    } catch (IOException e) {
                        fail = true;
                        Toast.makeText(getBaseContext(), "Socket creation failed", Toast.LENGTH_SHORT).show();
                    }
                    // Establish the Bluetooth socket connection.
                    try {
                        mBTSocket.connect();
                    } catch (IOException e) {
                        try {
                            fail = true;
                            mBTSocket.close();
                            mHandler.obtainMessage(CONNECTING_STATUS, -1, -1)
                                    .sendToTarget();
                        } catch (IOException e2) {
                            //insert code to deal with this
                            Toast.makeText(getBaseContext(), "Socket creation failed", Toast.LENGTH_SHORT).show();
                        }
                    }
                    if(!fail) {
                        mConnectedThread = new ConnectedThread(mBTSocket, mHandler);
                        mConnectedThread.start();

                        mHandler.obtainMessage(CONNECTING_STATUS, 1, -1, name)
                                .sendToTarget();
                    }
                }
            }.start();
        }
    };

    private BluetoothSocket createBluetoothSocket(BluetoothDevice device) throws IOException {
        try {
            final Method m = device.getClass().getMethod("createInsecureRfcommSocketToServiceRecord", UUID.class);
            return (BluetoothSocket) m.invoke(device, BT_MODULE_UUID);
        } catch (Exception e) {
            Log.e(TAG, "Could not create Insecure RFComm Connection",e);
        }
        return  device.createRfcommSocketToServiceRecord(BT_MODULE_UUID);
    }
}
# AndroidManifest.xml file
<?xml version="1.0" encoding="utf-8"?>
<manifest xmlns:android="http://schemas.android.com/apk/res/android" package="com.mcuhq.simplebluetooth">

    <uses-permission android:name="android.permission.BLUETOOTH" />
    <uses-permission android:name="android.permission.BLUETOOTH_ADMIN" />
    <uses-permission android:name="android.permission.ACCESS_FINE_LOCATION" />
    <uses-permission android:name="android.permission.ACCESS_COARSE_LOCATION" />

    <permission android:name="android.permission.BLUETOOTH" android:label="BLUETOOTH" />
    <permission android:name="android.permission.BLUETOOTH_ADMIN" />
    <permission android:name="android.permission.ACCESS_FINE_LOCATION" />
    <permission android:name="android.permission.ACCESS_COARSE_LOCATION" />

    <application
        android:allowBackup="true"
        android:icon="@mipmap/ic_launcher"
        android:label="@string/app_name"
        android:supportsRtl="true"
        android:theme="@style/AppTheme">
        <activity android:name=".MainActivity">
        <intent-filter>
        <action android:name="android.intent.action.MAIN" />

        <category android:name="android.intent.category.LAUNCHER" />
        </intent-filter>
        </activity>
        </application>

        </manifest>
* Web App Code
This web for all information of my project and ppt srs and known my group members.
If you have any problem then contact our group member. click here for checking my website.
#define int1 10
#define int2 9
#define int3 6
#define int4 5
#define front_light 13
#define left_light 12
#define right_light 11
#define main_light 8
#define back_light 7
#define speaker 3
#define vcc_ir 4
#define left_ir A0
#define right_ir A1
#define ldr A2
char data;
int ldrVal;
void setup() {
pinMode(int1, OUTPUT);
pinMode(int2, OUTPUT);
pinMode(int3, OUTPUT);
pinMode(int4, OUTPUT);
pinMode(main_light, OUTPUT); // main light (in car)
pinMode(front_light, OUTPUT); // front light
pinMode(back_light, OUTPUT); // back light
pinMode(left_light, OUTPUT); //side left light
pinMode(right_light, OUTPUT); //side right light
pinMode(speaker, OUTPUT); //speaker for horn
pinMode(vcc_ir, OUTPUT); //speaker for horn
pinMode(left_ir, INPUT); // initialize Left sensor as an input
pinMode(right_ir, INPUT); // initialize Right sensor as an input
pinMode(ldr, INPUT); // initialize ldr sensor for brightness
Serial.begin(9600); //Set the baud rate to your Bluetooth module.
}
void loop() {
if(Serial.available()){
data = Serial.read();
Serial.println(data);
}
ldrVal = analogRead(ldr);
if(ldrVal <= 400){
digitalWrite(main_light,HIGH);
digitalWrite(front_light,HIGH);
} else {
digitalWrite(main_light,LOW);
digitalWrite(front_light,LOW);
}
if(data == 'F'){ //move forward
digitalWrite(int1,HIGH);
digitalWrite(int3,HIGH);
digitalWrite(speaker,LOW);
digitalWrite(left_light,LOW);
digitalWrite(right_light,LOW);
digitalWrite(back_light,LOW);
}
else if(data == 'B'){ //move reverse
digitalWrite(int2,HIGH);
digitalWrite(int4,HIGH);
digitalWrite(back_light,HIGH);
digitalWrite(speaker,HIGH);
digitalWrite(left_light,LOW);
digitalWrite(right_light,LOW);
}
else if(data == 'L'){ //turn left
digitalWrite(int1,HIGH);
digitalWrite(int4,HIGH);
digitalWrite(left_light,HIGH);
digitalWrite(right_light,LOW);
}
else if(data == 'G'){ //turn forword left
digitalWrite(int1,HIGH);
analogWrite(int3,100);
digitalWrite(left_light,HIGH);
digitalWrite(right_light,LOW);
}
else if(data == 'H'){ //turn back left
digitalWrite(int2,HIGH);
analogWrite(int4,100);
digitalWrite(back_light,HIGH);
analogWrite(speaker,100);
digitalWrite(left_light,HIGH);
digitalWrite(right_light,LOW);
}
else if(data == 'J'){ //turn back right
analogWrite(int2,100);
digitalWrite(int4,HIGH);
digitalWrite(back_light,HIGH);
analogWrite(speaker,100);
digitalWrite(right_light,HIGH);
digitalWrite(left_light,LOW);
}
else if(data == 'I'){ //turn forword right
analogWrite(int1,100);
digitalWrite(int3,HIGH);
digitalWrite(right_light,HIGH);
digitalWrite(left_light,LOW);
}
else if(data == 'R'){ //turn right
digitalWrite(int3,HIGH);
digitalWrite(int2,HIGH);
digitalWrite(right_light,HIGH);
digitalWrite(left_light,LOW);
}
else if(data == 'W'){ //turn on front light
digitalWrite(front_light,HIGH);
}
else if(data == 'w'){ //turn off front light
digitalWrite(front_light,LOW);
}
else if(data == 'U'){ //turn on back light
digitalWrite(back_light,HIGH);
}
else if(data == 'u'){ //turn off back light
digitalWrite(back_light,LOW);
}
else if(data == 'V'){ //turn on horn
digitalWrite(speaker,HIGH);
}
else if(data == 'v'){ //turn off horn
digitalWrite(speaker,LOW);
}
else if(data == 'S'){ //STOP (all motors stop) and on back light
digitalWrite(int1,LOW);
digitalWrite(int2,LOW);
digitalWrite(int3,LOW);
digitalWrite(int4,LOW);
digitalWrite(back_light,HIGH);
digitalWrite(left_light,LOW);
digitalWrite(right_light,LOW);
digitalWrite(speaker,LOW);
}
else if(data == 'X'){ // this code for lane following
digitalWrite(vcc_ir,HIGH);
int LEFT_SENSOR = digitalRead(left_ir);
int RIGHT_SENSOR = digitalRead(right_ir);
if(RIGHT_SENSOR==0 && LEFT_SENSOR==0) {
analogWrite(int1,100);
analogWrite(int2,0);
analogWrite(int3,100); //FORWARD
analogWrite(int4,0);
digitalWrite(speaker,LOW);
digitalWrite(left_light,LOW);
digitalWrite(right_light,LOW);
digitalWrite(back_light,LOW);
}
else if(RIGHT_SENSOR==0 && LEFT_SENSOR==1) {
analogWrite(int1,150);
analogWrite(int4,150); //Move left
digitalWrite(left_light,HIGH);
digitalWrite(right_light,LOW);
digitalWrite(int2,LOW);
digitalWrite(int3,LOW);
}
else if(RIGHT_SENSOR==1 && LEFT_SENSOR==0) {
analogWrite(int3,150);
analogWrite(int2,150); //Move right
digitalWrite(right_light,HIGH);
digitalWrite(left_light,LOW);
digitalWrite(int1,LOW);
digitalWrite(int4,LOW);
}
else if(RIGHT_SENSOR==1 && LEFT_SENSOR==1) {
analogWrite(int1,0);
analogWrite(int2,0);
analogWrite(int3,0);
analogWrite(int4,0); //STOP
digitalWrite(back_light, HIGH);
digitalWrite(left_light,LOW);
digitalWrite(right_light,LOW);
digitalWrite(speaker,LOW);
}
}
else if(data =='x'){
digitalWrite(vcc_ir,LOW);
}
}
<?xml version="1.0" encoding="utf-8"?> <RelativeLayout xmlns:android="http://schemas.android.com/apk/res/android" xmlns:tools="http://schemas.android.com/tools" android:layout_width="match_parent" android:layout_height="match_parent" android:paddingBottom="@dimen/activity_vertical_margin" android:paddingLeft="@dimen/activity_horizontal_margin" android:paddingRight="@dimen/activity_horizontal_margin" android:paddingTop="@dimen/activity_vertical_margin" tools:context="com.example.philipgo.arduinobluetoothrccar.MainActivity"> <Button android:layout_width="wrap_content" android:layout_height="80dp" android:text="Forward" android:id="@+id/forward_btn" android:layout_marginTop="74dp" android:layout_alignParentTop="true" android:layout_toLeftOf="@+id/forward_right_btn" android:layout_toStartOf="@+id/forward_right_btn"> <Button android:layout_width="wrap_content" android:layout_height="80dp" android:text="forward LEFT" android:id="@+id/forward_left_btn" android:layout_below="@+id/forward_btn" android:layout_toLeftOf="@+id/forward_btn" android:layout_toStartOf="@+id/forward_btn" > <Button android:layout_width="wrap_content" android:layout_height="80dp" android:text="forward RIGHT" android:id="@+id/forward_right_btn" android:layout_above="@+id/reverse_btn" android:layout_toRightOf="@+id/reverse_btn" android:layout_toEndOf="@+id/reverse_btn" /> <Button android:layout_width="wrap_content" android:layout_height="80dp" android:text="REVERSE" android:id="@+id/reverse_btn" android:layout_below="@+id/forward_left_btn" android:layout_centerHorizontal="true" android:layout_marginTop="48dp" /> <Button android:layout_width="wrap_content" android:layout_height="80dp" android:text="Reverse Left" android:id="@+id/reverse_left_btn" android:layout_below="@+id/forward_left_btn" android:layout_alignLeft="@+id/forward_left_btn" android:layout_alignStart="@+id/forward_left_btn" android:layout_centerHorizontal="true" /> <Button android:layout_width="wrap_content" android:layout_height="80dp" android:text="Reverse Right" android:id="@+id/reverse_right_btn" android:layout_below="@+id/forward_right_btn" android:layout_toRightOf="@+id/reverse_btn" android:layout_alignRight="@+id/forward_right_btn" android:layout_alignEnd="@+id/forward_right_btn" /> <Button android:layout_width="wrap_content" android:layout_height="50dp" android:text="Connect to Bluetooth Device" android:id="@+id/bluetooth_connect_btn" android:layout_alignParentBottom="true" android:layout_centerHorizontal="true" /> </RelativeLayout>
package com.mcuhq.simplebluetooth;
import android.Manifest;
import android.bluetooth.BluetoothAdapter;
import android.bluetooth.BluetoothDevice;
import android.bluetooth.BluetoothSocket;
import android.content.BroadcastReceiver;
import android.content.Context;
import android.content.Intent;
import android.content.IntentFilter;
import android.content.pm.PackageManager;
import android.os.Bundle;
import android.os.Handler;
import android.os.Looper;
import android.os.Message;
import android.support.v4.app.ActivityCompat;
import android.support.v4.content.ContextCompat;
import android.support.v7.app.AppCompatActivity;
import android.util.Log;
import android.view.View;
import android.widget.AdapterView;
import android.widget.ArrayAdapter;
import android.widget.Button;
import android.widget.CheckBox;
import android.widget.ListView;
import android.widget.TextView;
import android.widget.Toast;
import java.io.IOException;
import java.io.UnsupportedEncodingException;
import java.lang.reflect.Method;
import java.util.Set;
import java.util.UUID;
public class MainActivity extends AppCompatActivity {
private final String TAG = MainActivity.class.getSimpleName();
private static final UUID BT_MODULE_UUID = UUID.fromString("00001101-0000-1000-8000-00805F9B34FB"); // "random" unique identifier
// #defines for identifying shared types between calling functions
private final static int REQUEST_ENABLE_BT = 1; // used to identify adding bluetooth names
public final static int MESSAGE_READ = 2; // used in bluetooth handler to identify message update
private final static int CONNECTING_STATUS = 3; // used in bluetooth handler to identify message status
// GUI Components
private TextView mBluetoothStatus;
private TextView mReadBuffer;
private Button mScanBtn;
private Button mOffBtn;
private Button mListPairedDevicesBtn;
private Button mDiscoverBtn;
private ListView mDevicesListView;
private CheckBox mLED1;
private BluetoothAdapter mBTAdapter;
private Set<BluetoothDevice> mPairedDevices;
private ArrayAdapter<String> mBTArrayAdapter;
private Handler mHandler; // Our main handler that will receive callback notifications
private ConnectedThread mConnectedThread; // bluetooth background worker thread to send and receive data
private BluetoothSocket mBTSocket = null; // bi-directional client-to-client data path
@Override
protected void onCreate(Bundle savedInstanceState) {
super.onCreate(savedInstanceState);
setContentView(R.layout.activity_main);
mBluetoothStatus = (TextView)findViewById(R.id.bluetooth_status);
mReadBuffer = (TextView) findViewById(R.id.read_buffer);
mScanBtn = (Button)findViewById(R.id.scan);
mOffBtn = (Button)findViewById(R.id.off);
mDiscoverBtn = (Button)findViewById(R.id.discover);
mListPairedDevicesBtn = (Button)findViewById(R.id.paired_btn);
mLED1 = (CheckBox)findViewById(R.id.checkbox_led_1);
mBTArrayAdapter = new ArrayAdapter<>(this, android.R.layout.simple_list_item_1);
mBTAdapter = BluetoothAdapter.getDefaultAdapter(); // get a handle on the bluetooth radio
mDevicesListView = (ListView)findViewById(R.id.devices_list_view);
mDevicesListView.setAdapter(mBTArrayAdapter); // assign model to view
mDevicesListView.setOnItemClickListener(mDeviceClickListener);
// Ask for location permission if not already allowed
if(ContextCompat.checkSelfPermission(this, Manifest.permission.ACCESS_COARSE_LOCATION) != PackageManager.PERMISSION_GRANTED)
ActivityCompat.requestPermissions(this, new String[]{Manifest.permission.ACCESS_COARSE_LOCATION}, 1);
mHandler = new Handler(Looper.getMainLooper()){
@Override
public void handleMessage(Message msg){
if(msg.what == MESSAGE_READ){
String readMessage = null;
try {
readMessage = new String((byte[]) msg.obj, "UTF-8");
} catch (UnsupportedEncodingException e) {
e.printStackTrace();
}
mReadBuffer.setText(readMessage);
}
if(msg.what == CONNECTING_STATUS){
if(msg.arg1 == 1)
mBluetoothStatus.setText("Connected to Device: " + msg.obj);
else
mBluetoothStatus.setText("Connection Failed");
}
}
};
if (mBTArrayAdapter == null) {
// Device does not support Bluetooth
mBluetoothStatus.setText("Status: Bluetooth not found");
Toast.makeText(getApplicationContext(),"Bluetooth device not found!",Toast.LENGTH_SHORT).show();
}
else {
mLED1.setOnClickListener(new View.OnClickListener(){
@Override
public void onClick(View v){
if(mConnectedThread != null) //First check to make sure thread created
mConnectedThread.write("1");
}
});
mScanBtn.setOnClickListener(new View.OnClickListener() {
@Override
public void onClick(View v) {
bluetoothOn();
}
});
mOffBtn.setOnClickListener(new View.OnClickListener(){
@Override
public void onClick(View v){
bluetoothOff();
}
});
mListPairedDevicesBtn.setOnClickListener(new View.OnClickListener() {
@Override
public void onClick(View v){
listPairedDevices();
}
});
mDiscoverBtn.setOnClickListener(new View.OnClickListener(){
@Override
public void onClick(View v){
discover();
}
});
}
}
private void bluetoothOn(){
if (!mBTAdapter.isEnabled()) {
Intent enableBtIntent = new Intent(BluetoothAdapter.ACTION_REQUEST_ENABLE);
startActivityForResult(enableBtIntent, REQUEST_ENABLE_BT);
mBluetoothStatus.setText("Bluetooth enabled");
Toast.makeText(getApplicationContext(),"Bluetooth turned on",Toast.LENGTH_SHORT).show();
}
else{
Toast.makeText(getApplicationContext(),"Bluetooth is already on", Toast.LENGTH_SHORT).show();
}
}
// Enter here after user selects "yes" or "no" to enabling radio
@Override
protected void onActivityResult(int requestCode, int resultCode, Intent Data){
// Check which request we're responding to
if (requestCode == REQUEST_ENABLE_BT) {
// Make sure the request was successful
if (resultCode == RESULT_OK) {
// The user picked a contact.
// The Intent's data Uri identifies which contact was selected.
mBluetoothStatus.setText("Enabled");
}
else
mBluetoothStatus.setText("Disabled");
}
}
private void bluetoothOff(){
mBTAdapter.disable(); // turn off
mBluetoothStatus.setText("Bluetooth disabled");
Toast.makeText(getApplicationContext(),"Bluetooth turned Off", Toast.LENGTH_SHORT).show();
}
private void discover(){
// Check if the device is already discovering
if(mBTAdapter.isDiscovering()){
mBTAdapter.cancelDiscovery();
Toast.makeText(getApplicationContext(),"Discovery stopped",Toast.LENGTH_SHORT).show();
}
else{
if(mBTAdapter.isEnabled()) {
mBTArrayAdapter.clear(); // clear items
mBTAdapter.startDiscovery();
Toast.makeText(getApplicationContext(), "Discovery started", Toast.LENGTH_SHORT).show();
registerReceiver(blReceiver, new IntentFilter(BluetoothDevice.ACTION_FOUND));
}
else{
Toast.makeText(getApplicationContext(), "Bluetooth not on", Toast.LENGTH_SHORT).show();
}
}
}
final BroadcastReceiver blReceiver = new BroadcastReceiver() {
@Override
public void onReceive(Context context, Intent intent) {
String action = intent.getAction();
if(BluetoothDevice.ACTION_FOUND.equals(action)){
BluetoothDevice device = intent.getParcelableExtra(BluetoothDevice.EXTRA_DEVICE);
// add the name to the list
mBTArrayAdapter.add(device.getName() + "\n" + device.getAddress());
mBTArrayAdapter.notifyDataSetChanged();
}
}
};
private void listPairedDevices(){
mBTArrayAdapter.clear();
mPairedDevices = mBTAdapter.getBondedDevices();
if(mBTAdapter.isEnabled()) {
// put it's one to the adapter
for (BluetoothDevice device : mPairedDevices)
mBTArrayAdapter.add(device.getName() + "\n" + device.getAddress());
Toast.makeText(getApplicationContext(), "Show Paired Devices", Toast.LENGTH_SHORT).show();
}
else
Toast.makeText(getApplicationContext(), "Bluetooth not on", Toast.LENGTH_SHORT).show();
}
private AdapterView.OnItemClickListener mDeviceClickListener = new AdapterView.OnItemClickListener() {
@Override
public void onItemClick(AdapterView parent, View view, int position, long id) {
if(!mBTAdapter.isEnabled()) {
Toast.makeText(getBaseContext(), "Bluetooth not on", Toast.LENGTH_SHORT).show();
return;
}
mBluetoothStatus.setText("Connecting...");
// Get the device MAC address, which is the last 17 chars in the View
String info = ((TextView) view).getText().toString();
final String address = info.substring(info.length() - 17);
final String name = info.substring(0,info.length() - 17);
// Spawn a new thread to avoid blocking the GUI one
new Thread()
{
@Override
public void run() {
boolean fail = false;
BluetoothDevice device = mBTAdapter.getRemoteDevice(address);
try {
mBTSocket = createBluetoothSocket(device);
} catch (IOException e) {
fail = true;
Toast.makeText(getBaseContext(), "Socket creation failed", Toast.LENGTH_SHORT).show();
}
// Establish the Bluetooth socket connection.
try {
mBTSocket.connect();
} catch (IOException e) {
try {
fail = true;
mBTSocket.close();
mHandler.obtainMessage(CONNECTING_STATUS, -1, -1)
.sendToTarget();
} catch (IOException e2) {
//insert code to deal with this
Toast.makeText(getBaseContext(), "Socket creation failed", Toast.LENGTH_SHORT).show();
}
}
if(!fail) {
mConnectedThread = new ConnectedThread(mBTSocket, mHandler);
mConnectedThread.start();
mHandler.obtainMessage(CONNECTING_STATUS, 1, -1, name)
.sendToTarget();
}
}
}.start();
}
};
private BluetoothSocket createBluetoothSocket(BluetoothDevice device) throws IOException {
try {
final Method m = device.getClass().getMethod("createInsecureRfcommSocketToServiceRecord", UUID.class);
return (BluetoothSocket) m.invoke(device, BT_MODULE_UUID);
} catch (Exception e) {
Log.e(TAG, "Could not create Insecure RFComm Connection",e);
}
return device.createRfcommSocketToServiceRecord(BT_MODULE_UUID);
}
}
<?xml version="1.0" encoding="utf-8"?> <manifest xmlns:android="http://schemas.android.com/apk/res/android" package="com.mcuhq.simplebluetooth"> <uses-permission android:name="android.permission.BLUETOOTH" /> <uses-permission android:name="android.permission.BLUETOOTH_ADMIN" /> <uses-permission android:name="android.permission.ACCESS_FINE_LOCATION" /> <uses-permission android:name="android.permission.ACCESS_COARSE_LOCATION" /> <permission android:name="android.permission.BLUETOOTH" android:label="BLUETOOTH" /> <permission android:name="android.permission.BLUETOOTH_ADMIN" /> <permission android:name="android.permission.ACCESS_FINE_LOCATION" /> <permission android:name="android.permission.ACCESS_COARSE_LOCATION" /> <application android:allowBackup="true" android:icon="@mipmap/ic_launcher" android:label="@string/app_name" android:supportsRtl="true" android:theme="@style/AppTheme"> <activity android:name=".MainActivity"> <intent-filter> <action android:name="android.intent.action.MAIN" /> <category android:name="android.intent.category.LAUNCHER" /> </intent-filter> </activity> </application> </manifest>